

An Illustrated Guide to Prototypes and Instances
 Armelline
Member, PRO Posts: 5,482
Armelline
Member, PRO Posts: 5,482
As a freelance GameSalad developer, and someone who tries to help members of this community as often as possible, there's one big mistake I see people make time and time again. It's a basic mistake that causes huge amounts of confusion. It's a mistake we all make when we first start using GameSalad - I had to abandon my first GameSalad game after making this mistake too many times to recover from! It all starts with this:
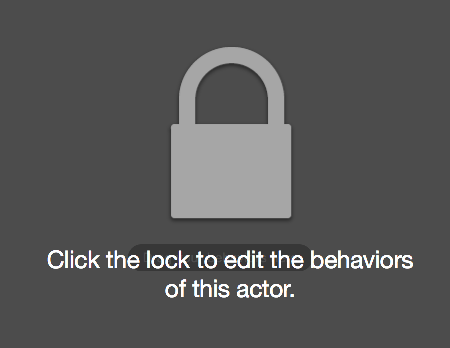
You've put an actor on the scene, and the intuitive thing to do is to double click on it to open it up. But it's locked! Silly actor. So you do the obvious thing - you unlock it.
Unfortunately, doing that causes all kinds of problems.
★ Section 1: Prototypes and Instances ★
There are two types of actors that you encounter when using GameSalad. Prototypes, and Instances. We'll start by exploring the difference between a prototype and an instance.
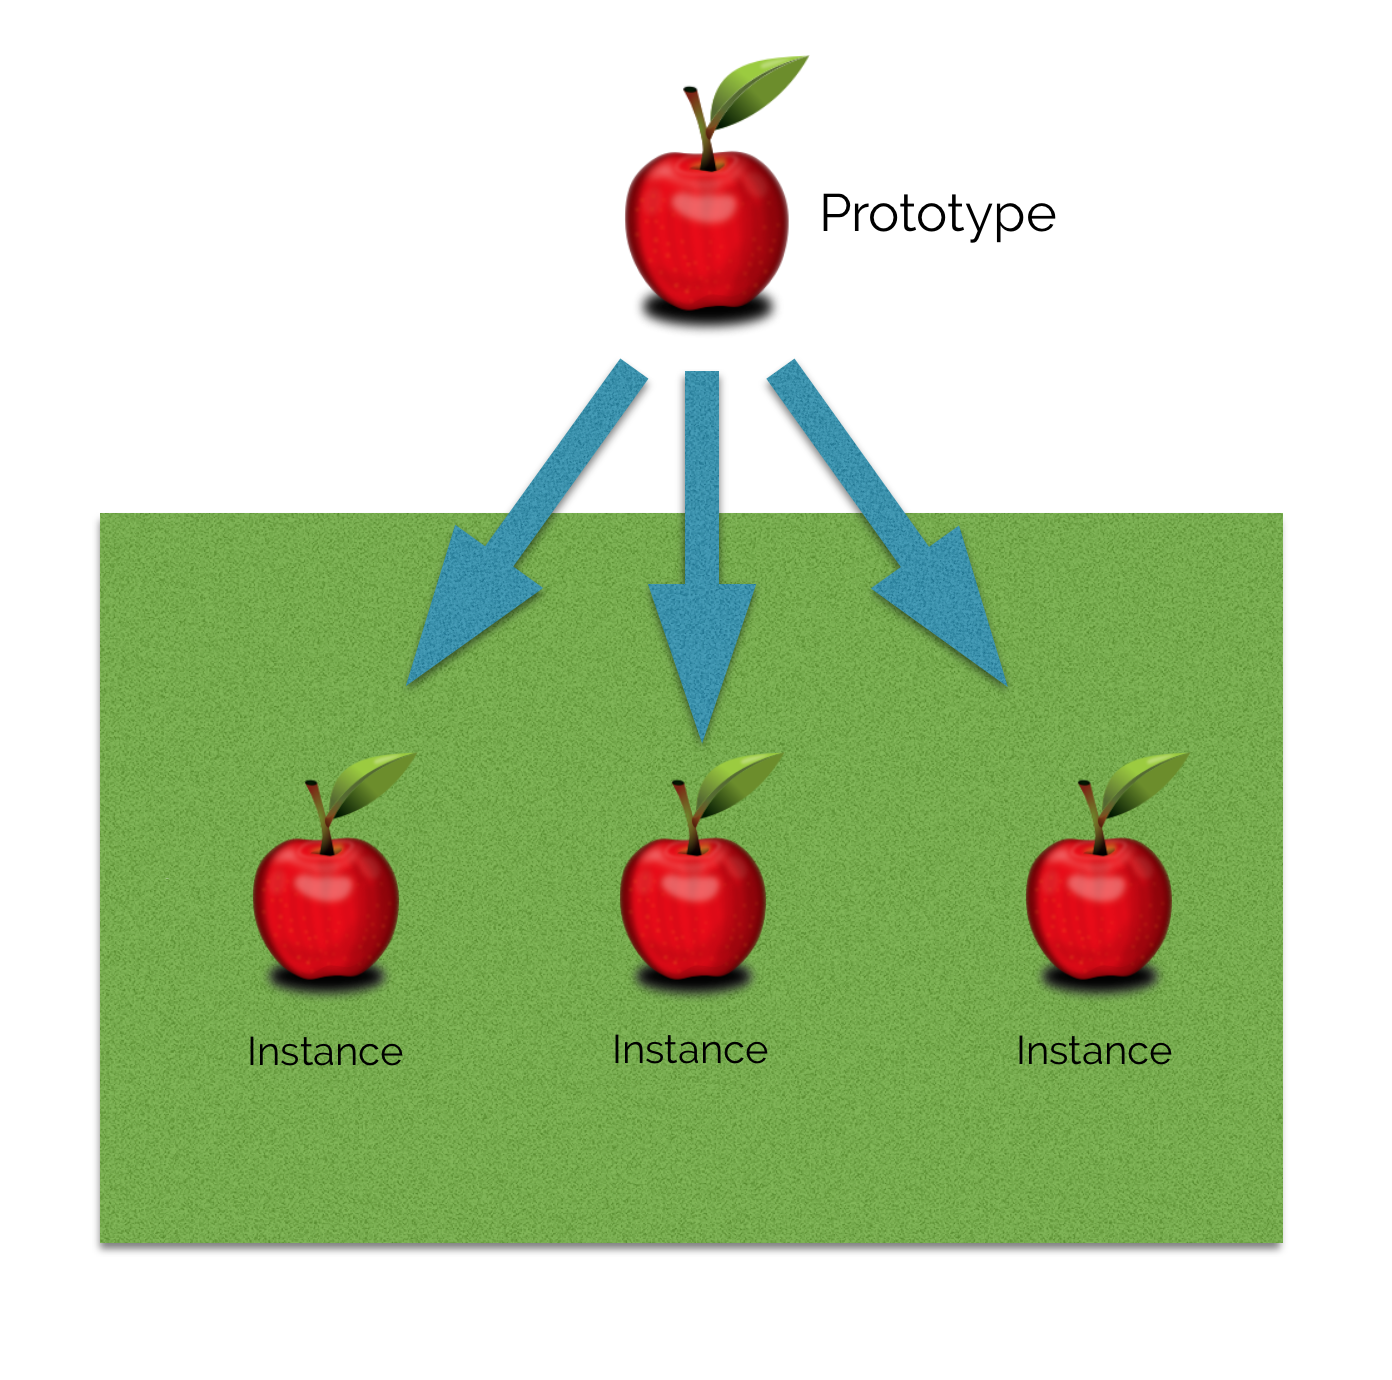
Take a look at the picture below. You'll see one prototype actor and three instance actors. Delicious, ripe apples. The prototype is at the top, off the scene. The three instances actors are all on the scene.
All the actors in the Actors list on the left side of your GameSalad window are prototype actors. They're, as it were, the originals. Here's the Actors list with our prototype apple actor selected.

To edit a prototype in GameSalad, just double click on it in the actors list.

Whenever you drag a prototype actor onto a scene in your game, it becomes an instance of that prototype. As long as it remains locked, though, everything you do the prototype will also happen to all the instances. If I make the prototype green, all the locked instances become green too. Change the image, the size, the alpha, add logic, remove logic... everything you do to the prototype happens to the instances too. They remain connected.

★ Section 2: An Example In GameSalad ★
Let's take a look at an example of how this works, looking at GameSalad. We're going to make a simple scene, and put apples on it. Then we'll see how unlocking an instance actor changes things.
First, we're going to edit our prototype. All we're going to do is to put a Display Text behaviour in it. This Display Text behaviour is simply going to tell us the colour of the apple.

When we preview our scene, it looks like this:

We have our apple, and the display text is telling us the colour we wrote in it: Red. We edited the prototype in the actors list, and the change was visible on the instance actor we put on the scene!
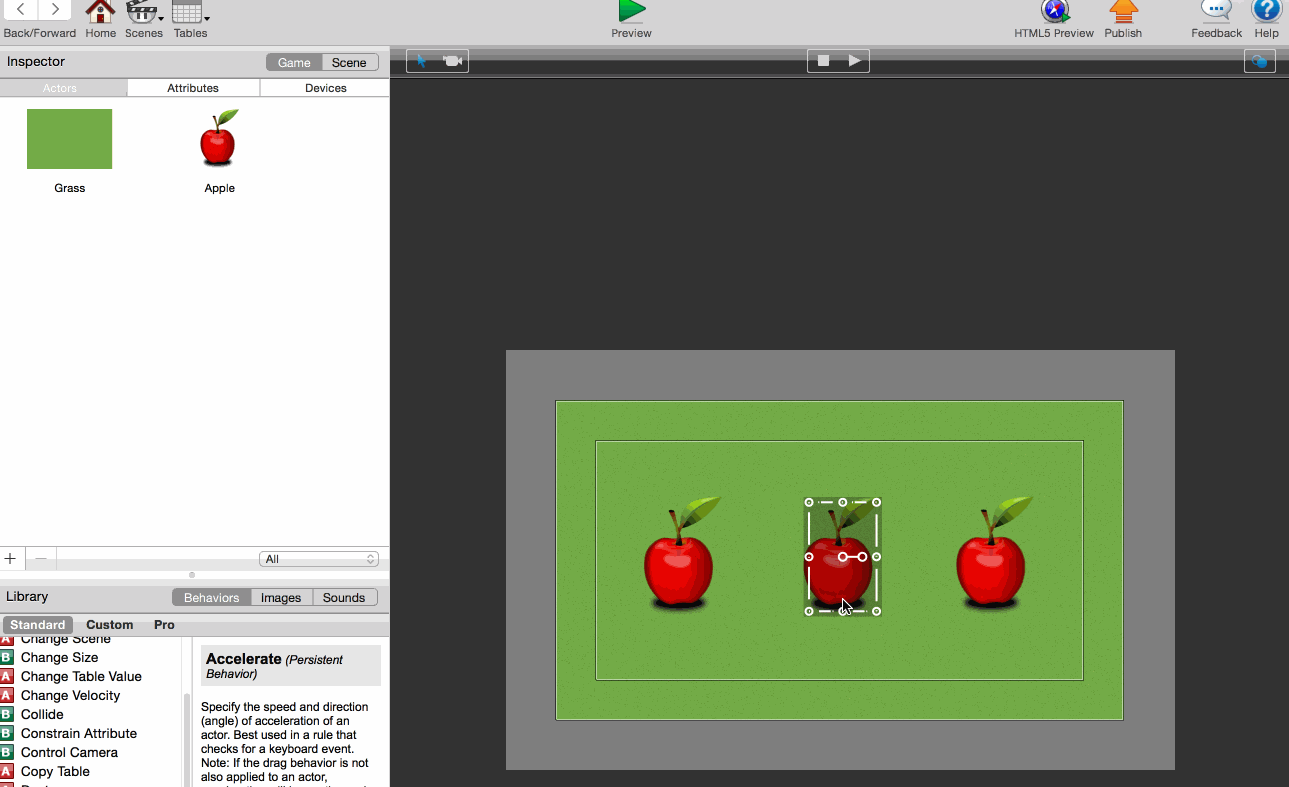
Time for some more apples.

Now we're put three instances of the apple on our scene. At the moment, they're all locked, and so everything we've done to the prototype will have been done to these too.

Now let's unlock one. To do this, we double click on the instance actor on our scene, and then click on the big padlock icon. Once we've done that, we're going to change the colour written in the Display Text behaviour.
You'll hopefully have noticed that now we've unlocked the instance actor, the change we made to it only happened to that one actor! An unlocked actor is all alone. Nothing we do to any other actor will affect it and nothing we do to it will affect any other actor. (Obviously if you add certain logic this isn't strictly true, but it's a general rule of thumb.)
Let's change the image of our instance actor too, while we're at it.

This will give us this tasty looking result:

One thing to note here is that you can change certain aspects of ALL instance actors, locked or unlocked, and only the specific instance you change will be affected. More on that later, though!
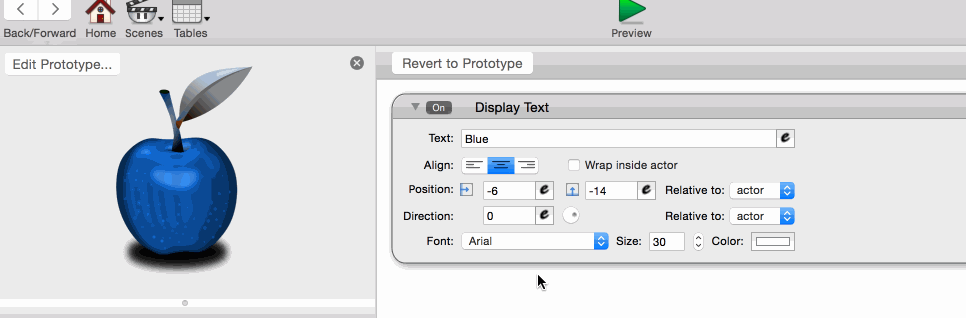
Now, to illustrate the effect that unlocking an actor has, let's edit our prototype. You'll notice that even though we change the prototype's colour, and edit the Display Text behaviour, our blue apple stays blue! Since that instance actor is unlocked, nothing we do to the prototype will affect it.

What if you change your mind, though, and want to make an unlocked instance back into a locked instance, and once again have it be affected by the prototype? All you have to do is click the "Revert to Prototype" button. This will re-lock your actor.

Were we to preview our scene again, the Display Text behaviour being displayed by our formerly-unlocked blue apple would be the one from the prototype, not the one we edited to say "Blue". You'll notice the colour of the apple hasn't changed, though. GameSalad will give priority to the image you put on an actor, not the one the prototype has. This is a little confusing at first, will make more sense soon!

★ Section 3: When to Unlock Actors ★
You might be wondering at this point when you should unlock an actor. The safe answer is - almost never. Some people may argue I'm wrong here, but I'm not.
Keeping actors locked unless it's absolutely essential to unlock them is simply good practice. Occasionally it'll mean you'll need to add a few lines of logic to your game that you could avoid by unlocking some actors, but keeping them locked will make maintaining your game, and making changes to it, much much easier.
I'll accept that sometimes unlocking some actors can save you time, and in quick projects it won't really matter if you can easily maintain them. As with most things, you'll just have to use your discretion. Always stop before you unlock an actor, though, and ask yourself "Do I really need to unlock this actor?" I'm going to look now though at the only reason you're likely to come across that you absolutely will need to unlock an actor, and you should.
That's when you want to access the Scene Attributes.

If you want to have access to the camera, or to self-attributes in another actor on the scene (such as it's size or position), you'll need to unlock your actor to gain access to these attributes. In most cases there are better ways of getting this information, but sometimes unlocking your actor is the only or best way to go.

★ Section 4: Changes to a Specific Actor ★
"But WAIT, how do I make changes to a specific actor then?"
Good question. What do you do if you have three apples and want to have them display different Display Text behaviours? You might be tempted to make three actors, and you'd be wrong. You might be tempted to just unlock the damn things, and you'd be wrong. You might do that even though I'm telling you not to, and that's fine. I don't hold a grudge. But when you realise later that you need to add an extra behaviour to your apple, you'll be having to add it to each and every one. If you follow this simple trick, you'll only have to make that change once.
What we're going to do instead of unlocking our instance actors is we're going to add a self attribute to the prototype (you'll notice you can't add attributes to instances - only to prototypes). The new attribute is highlighted blue. I probably should have called it something more unique than colour, but too late now!

Now that we have our new attribute, we have a way of distinguishing between instance actors. Let's open one of our green apple instance actors by double clicking on it. You'll notice the padlock is there on the right, so we're working with an locked instance, and any changes we make to the prototype will affect this one too.

However, any changes we make to this instance actor's image or attributes will only affect this instance actor. So we can put a colour (or any other text) in this text self-attribute and it'll only affect this specific instance actor. We're putting "Green" in the attribute for this instance.
And "Blue" in the attribute for this instance.

The more eagle-eyed amongst you will have spotted a change to our prototype's Display Text behaviour. Now that each instance of our apple actor prototype has been given its own colour name using that self attribute, we can have each apple display the correct colour by changing the Display Text attribute to display this new self attribute instead of a pre-defined colour:

When we preview our scene now, we see this (hopefully) expected result:

You might well still be saying "But why! That was a ton more work than just unlocking the actors! This is stupid. You're stupid and you smell!" Well, once I stopped crying I'd explain to you that it's a little bit of extra work now, but will probably save you lots of work later. Let's take a look at an example of a change we might make and how doing things this way saves us time. And I don't smell ![]()
Let's add a particles effect to our apple prototype actor.

We've made once change, and now every locked instance of this actor will reflect that change too. With three apples that's not a big deal. But what if we had 50 apples? And what if we made 50 changes that we wanted every apple to reflect? Very soon adding those 50 changes to 50 actors gets very, very boring indeed. This way, we make the changes only to the prototype. And tasty changes they are too!

★ Section 5: Changes to Instances ★
There are some changes you can make to instance actors that won't be over-ridden by the prototype. This has been touched on already in this tutorial, but I'll say just a little bit more about it.
If you double click on an instance actor and don't unlock it, you can still edit a variety of different things. The actor's size, position, colour, image, physics properties. When you preview your game, these things will not be overridden by the prototype actor. GameSalad will respect that you've made these changes, and considers your changes to be sacred. Anything you do to your instance actors without unlocking them will still be changed when you press that play button.
However, if you have a rule in your prototype that changes any of things thing during runtime, that will take precedence. Let's say my prototype apple is 50 x 50px in size. If I change an instance actor to be 100 x 100px, it still will be when I press play. If I trigger a rule in the prototype that says to make the actor 200 pixels wide, that will still apply to all locked instance actors, overriding any changes you made manually.
It's important that this is how things work, as it gives you essentially the best of both worlds. You can make changes to your instance actors that are specific to that one instance without needing to unlock it, and still benefit from having the one central place to make other changes - the prototype.
If you haven't made any change to an attribute in an instance actor, for example the actor's width and height, and you make a change to the prototype, it will change the instance. If you've manually changed the instance actor's width and height, and then go and change the prototype's width and height, it will not change the instance actor.
The gif below demonstrates this. First, we change the leftmost apple to be blue. When we preview the scene, we see that apple is now indeed blue, even though we didn't unlock it. We then change the colour of the prototype actor. Since we've made a change to the leftmost image, any change we make to the prototype's image (unless we do it during runtime using logic) won't be reflected in this instance actor. It will, however, be reflected in the other two apples.

And that's it for this tutorial! Hopefully it's helped to untangle some of the confusion of the big padlock that plagues so many of us. If you've skipped through the tutorial and just looked at the pictures, I strongly recommend you take the time to read through it. Unless you're really confident about this stuff anyway, I guess. But then what are you even doing here!
Until next time!
Also, it's 3am here so I'll proof read this tomorrow...
- Armelline
Comments
great job!
Nice work :*
Thanks Armelline
Wow, another super detailed explanation. Great work!
Excellent explanation! This is something many people, even those who have used the engine for many months, still do. It's great to see a detailed and well thought out post on this subject! Great job!
Very well explained!
Great tutorial, man!
Thanks for the feedback guys! I'll keep making them if people are finding them useful. Though this one I considered a kind of public service!
Any request for the subject of the next tutorial? I was thinking either Timers or Movement Types.
I´d say Timers. But Movement Types might be better for beginners. At least that was what I focused on when I started.
When you are done with the tutorials, perhaps compile them all together and make a e-book. "Armelline's Guide to Gamesalad"
With all the animated gifs it'll be hard to do, but perhaps I'll throw them together in a website for each reference!
Really nice tutorial...... Object oriented programming takes a bit new logic to learn....
YAS!!! I was so confused on this aspect and you cleared it up completely. Thank you for these posts!!
Thanks for the article. I'm a GS newbie making a game similar to Fists of Fury. I'll have different scenes where the hero and attackers change a bit each scene (eg, in one scene, the hero will smash fruit flying at them; in another, balls will fly at the hero and will bounch on Collide - thus different Behaviors).
So far I've made one scene, all done with actor prototypes and game attributes, which I'm now realizing may not work for my other scenes. So I'm wondering if the balls should be different actors entirely, or unlocked instances of the fruit? (Maybe I could change the Tag for the balls and say "If #ball, then collide; Otherwise do the fruit smash effects.?"
Also, all my fruits spawn onto my scene (thus I never dragged one onto the scene), so how do I unlock it if I can't double-click it since it's not visible in the scene display?
@coreystone
You can´t unlock spawned actors.
In your case, i´d make the ball and fruit a different actor.
I don´t recommend unlocking actors if it isn´t absolutely necessary. It´s extremely easy to brake your game if you´r not 100% sure on what you are doing.
iBooks can handle all that kind of stuff")
Was Pages but same same :P
Thanks for the info